


Description
Solderless LED Strip-to-Strip Joiner: Extend and Repair with Ease
A Solderless LED Strip-to-Strip Joiner is an essential accessory for anyone working with LED strip lights. These incredibly useful connectors allow you to link two separate segments of LED strip together in a straight line, opening up a world of possibilities for customization and repair. Have you ever cut a strip just a little too short? Or have a leftover piece you want to use? The Solderless LED Strip-to-Strip Joiner is the perfect solution. It eliminates the need for precision soldering, allowing you to create secure, reliable connections quickly and easily, ensuring a professional and durable result for your lighting project.
Types of Solderless LED Strip-to-Strip Joiners
Our joiner connectors come in two distinct styles to meet different project needs:
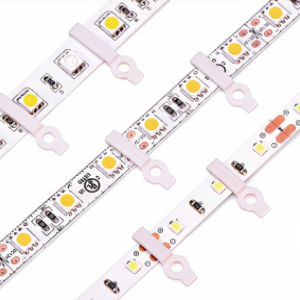
- Gapless Joiners (
Quick Connector): These compact connectors are designed to join two strip ends together with virtually no space in between. They are the perfect choice when you want to create a long, continuous run of light that appears as a single, unbroken strip. The LED spacing is maintained across the join, preventing any dark spots. - Gap Joiners (
10mm Gap): These connectors feature a short, flexible wire between the two connector ends. They are ideal for navigating small, awkward surface interruptions—like the seam between two cabinets—without having to run long extension wires. The flexible gap allows for slight adjustments and bends.
How to Use a Strip-to-Strip Joiner
Using a Solderless LED Strip-to-Strip Joiner is incredibly simple.
- Prepare Your Strips: Ensure both LED strip ends are cleanly cut along their designated copper cut lines.
- Expose the Contacts: For waterproof (IP54/IP65) strips, the silicone coating must be carefully removed from the top of the copper pads.
- Open the Connector: Lift the white clasps on both ends of the joiner.
- Insert the Strips: Slide each strip end into an open clasp, making sure the copper pads are positioned directly under the internal metal pins of the connector.
- Check Polarity: This is vital. Ensure the polarity markings (+ to +, G to G, etc.) on both strips are correctly aligned. A reversed connection will not work.
- Secure the Connection: Snap both clasps firmly shut. You will feel them lock into place, securing the strips.
- Test the Connection: Briefly apply power to test the connection before final installation.
This simple process is a game-changer compared to traditional soldering. For more ideas on custom LED projects, forums like the DIY Stack Exchange can be a great source of inspiration.
Applications for LED Strip Joiners
A Solderless LED Strip-to-Strip Joiner is a versatile tool for many situations:
- Extending Runs: Combine a full reel with a leftover piece to achieve the perfect length for a large room or long cove.
- Utilizing Scraps: Don’t throw away those leftover pieces from a project! Use joiners to combine them for use in smaller applications like shelf or drawer lighting.
- Quick Repairs: If a small section of your LED strip gets damaged, simply cut out the damaged part and use two joiners and a small new piece to patch it seamlessly.
- Custom Projects: Use our RGB LED Strips and joiners to create custom-length lighting for any project you can imagine.
Frequently Asked Questions (FAQs)
Q: Does using a joiner affect the brightness of the LED strip? A: No. When used correctly, our joiners create a secure electrical connection with minimal resistance, and will not cause any noticeable dimming or change in brightness.
Q: Are these connectors waterproof? A: The connectors themselves are not waterproof. If you use them on a waterproof strip in a location exposed to moisture, the connection points must be sealed with clear silicone adhesive or waterproof heat shrink tubing to maintain the integrity of the weatherproofing.


Reviews
There are no reviews yet.